In this tutorial, we explain how to create a new type in Alfresco. To do that, we are implementing a quite simple example.
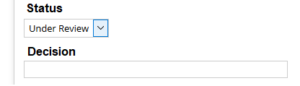
Let’s say we work in the Human Resources department, and we are looking for an expert in Alfresco and we want to keep the candidates’ information in our Alfresco repository. For that purpose, we will add a new type to store their resumes. This document type will have two properties: status and decision.
The status will have the values “Under review” and “Ready”.
1. Add your name space
Go to content-model.xml, and add a custom namespace for your custom model. In our case, we are going to use “ex”
<!-- Custom namespace -->
<namespaces>
  <namespace uri="http://www.example.com/model/content/1.0" prefix="ex" />
</namespaces>
2. Create a constraint list to set the allowed values for the property status
<constraints>
  <constraint name="ex:allowedStatus" type="LIST">
    <parameter name="allowedValues">
      <list>
        <value>Under Review</value>
        <value>Ready</value>
      </list>
    </parameter>
  </constraint>
</constraints>
3. Add the type’s definition
<types>
  <!-- CV type -->
  <type name="ex:cv">
    <title>CV</title>
    <properties>
      <property name="ex:status">
        <title>status</title>
        <type>d:text</type>
        <constraints>
          <constraint ref="ex:allowedStatus"/>
        </constraints>
      </property>
      <property name="ex:decision">
        <title>decision</title>
        <type>d:text</type>
      </property>
    </properties>
  </type>
</types>
Now, you have your custom type ready!
4. Change share-config-custom.xml to make the new type available in the change type list in Share
You can have a model in Alfresco, but that doesn’t mean that Share will use it directly. It’s necessary to define in Share how the new type will be displayed. To add this configuration, go to share-config-custom.xml and include your custom type as a subtype of “cm:content”
<types>
  <type name="cm:content">
    <subtype name="ex:cv" />
  </type>
</types>
5. Add a label for your custom type
Go to web-extension/messages/*-share-amp.properties and add a name for your type, using the following syntax:
type.{namespace}_{type}={label}
#Names for types
type.ex_resume=Resume
6. Set the fields’ visibility
Add in share-config-custom.xml
<!-- ex:resume -->
<config evaluator="model-type" condition="ex:cv">
  <forms>
    <form>
      <field-visibility>
        <show id="ex:status" force="true"/>
        <show id="ex:decision" force="true"/>
      </field-visibility>
    </form>
  </forms>
</config>
And voilà